

§Handling form submission
§Overview
Form handling and submission is an important part of any web application. Play comes with features that make handling simple forms easy and complex forms possible.
Play’s form handling approach is based around the concept of binding data. When data comes in from a POST request, Play will look for formatted values and bind them to a Form object. From there, Play can use the bound form to value a case class with data, call custom validations, and so on.
Typically forms are used directly from a Controller instance. However, Form definitions do not have to match up exactly with case classes or models: they are purely for handling input and it is reasonable to use a distinct Form for a distinct POST.
§Imports
To use forms, import the following packages into your class:
import play.api.data._
import play.api.data.Forms._§Form Basics
We’ll go through the basics of form handling:
- defining a form,
- defining constraints in the form,
- validating the form in an action,
- displaying the form in a view template,
- and finally, processing the result (or errors) of the form in a view template.
The end result will look something like this:
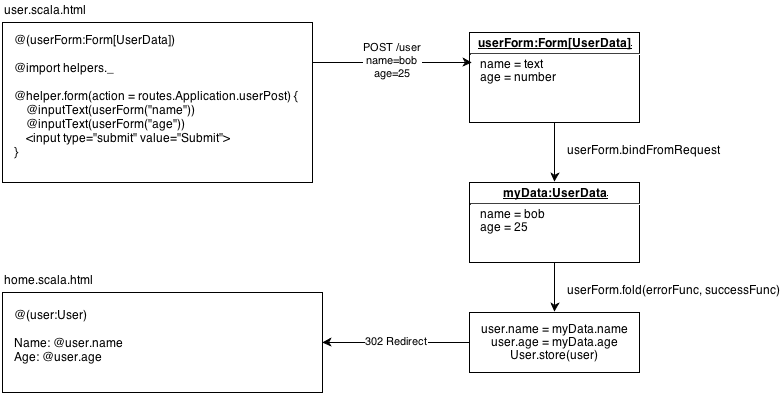
§Defining a form
First, define a case class which contains the elements you want in the form. Here we want to capture the name and age of a user, so we create a UserData object:
case class UserData(name: String, age: Int)Now that we have a case class, the next step is to define a Form structure. The function of a `Form is to transform form data into a bound instance of a case class, and we define it like follows:
val userForm = Form(
  mapping(
    "name" -> text,
    "age" -> number
  )(UserData.apply)(UserData.unapply)
)
The Forms object defines the mapping method. This method takes the names and constraints of the form, and also takes two functions: an apply function and an unapply function. Because UserData is a case class, we can plug its apply and unapply methods directly into the mapping method.
Note: Maximum number of fields for a single tuple or mapping is 22 due to the way form handling is implemented. If you have more than 22 fields in your form, you should break down your forms using lists or nested values.
A form will create UserData instance with the bound values when given a Map:
val anyData = Map("name" -> "bob", "age" -> "21")
val userData = userForm.bind(anyData).get
But most of the time you’ll use forms from within an Action, with data provided from the request. Form contains bindFromRequest, which will take a request as an implicit parameter. If you define an implicit request, then bindFromRequest will find it.
val userData = userForm.bindFromRequest.getNote: There is a catch to using
gethere. If the form cannot bind to the data, thengetwill throw an exception. We’ll show a safer way of dealing with input in the next few sections.
You are not limited to using case classes in your form mapping. As long as the apply and unapply methods are properly mapped, you can pass in anything you like, such as tuples using the Forms.tuple mapping or model case classes. However, there are several advantages to defining a case class specifically for a form:
- Form specific case classes are convenient. Case classes are designed to be simple containers of data, and provide out of the box features that are a natural match with
Formfunctionality. - Form specific case classes are powerful. Tuples are convenient to use, but do not allow for custom apply or unapply methods, and can only reference contained data by arity (
_1,_2, etc.) - Form specific case classes are targeted specifically to the Form. Reusing model case classes can be convenient, but often models will contain additional domain logic and even persistence details that can lead to tight coupling. In addition, if there is not a direct 1:1 mapping between the form and the model, then sensitive fields must be explicitly ignored to prevent a parameter tampering attack.
§Defining constraints on the form
The text constraint considers empty strings to be valid. This means that name could be empty here without an error, which is not what we want. A way to ensure that name has the appropriate value is to use the nonEmptyText constraint.
val userFormConstraints2 = Form(
  mapping(
    "name" -> nonEmptyText,
    "age" -> number(min = 0, max = 100)
  )(UserData.apply)(UserData.unapply)
)
Using this form will result in a form with errors if the input to the form does not match the constraints:
val boundForm = userFormConstraints2.bind(Map("bob" -> "", "age" -> "25"))
boundForm.hasErrors must beTrue
The out of the box constraints are defined on the Forms object:
text: maps toscala.String, optionally takesminLengthandmaxLength.nonEmptyText: maps toscala.String, optionally takesminLengthandmaxLength.number: maps toscala.Int, optionally takesmin,max, andstrict.longNumber: maps toscala.Long, optionally takesmin,max, andstrict.bigDecimal: takesprecisionandscale.date,sqlDate,jodaDate: maps tojava.util.Date,java.sql.Dateandorg.joda.time.DateTime, optionally takespatternandtimeZone.jodaLocalDate: maps toorg.joda.time.LocalDate, optionally takespattern.email: maps toscala.String, using an email regular expression.boolean: maps toscala.Boolean.checked: maps toscala.Boolean.optional: maps toscala.Option.
§Defining ad-hoc constraints
You can define your own ad-hoc constraints on the case classes using the validation package.
val userFormConstraints = Form(
  mapping(
    "name" -> text.verifying(nonEmpty),
    "age" -> number.verifying(min(0), max(100))
  )(UserData.apply)(UserData.unapply)
)
You can also define ad-hoc constraints on the case classes themselves:
def validate(name: String, age: Int) = {
  name match {
    case "bob" if age >= 18 =>
      Some(UserData(name, age))
    case "admin" =>
      Some(UserData(name, age))
    case _ =>
      None
  }
}

val userFormConstraintsAdHoc = Form(
  mapping(
    "name" -> text,
    "age" -> number
  )(UserData.apply)(UserData.unapply) verifying("Failed form constraints!", fields => fields match {
    case userData => validate(userData.name, userData.age).isDefined
  })
)
You also have the option of constructing your own custom validations. Please see the custom validations section for more details.
§Validating a form in an Action
Now that we have constraints, we can validate the form inside an action, and process the form with errors.
We do this using the fold method, which takes two functions: the first is called if the binding fails, and the second is called if the binding succeeds.
userForm.bindFromRequest.fold(
  formWithErrors => {
    // binding failure, you retrieve the form containing errors:
    BadRequest(views.html.user(formWithErrors))
  },
  userData => {
    /* binding success, you get the actual value. */
    val newUser = models.User(userData.name, userData.age)
    val id = models.User.create(newUser)
    Redirect(routes.Application.home(id))
  }
)
In the failure case, we render the page with BadRequest, and pass in the form with errors as a parameter to the page. If we use the view helpers (discussed below), then any errors that are bound to a field will be rendered in the page next to the field.
In the success case, we’re sending a Redirect with a route to routes.Application.home here instead of rendering a view template. This pattern is called Redirect after POST, and is an excellent way to prevent duplicate form submissions.
Note: “Redirect after POST” is required when using
flashingor other methods with flash scope, as new cookies will only be available after the redirected HTTP request.
Alternatively, you can use the parse.form body parser that binds the content of the request to your form.
val userPost = Action(parse.form(userForm)) { implicit request =>
  val userData = request.body
  val newUser = models.User(userData.name, userData.age)
  val id = models.User.create(newUser)
  Redirect(routes.Application.home(id))
}
In the failure case, the default behaviour is to return an empty BadRequest response. You can override this behaviour with your own logic. For instance, the following code is completely equivalent to the preceding one using bindFromRequest and fold.
val userPostWithErrors = Action(parse.form(userForm, onErrors = (formWithErrors: Form[UserData]) => BadRequest(views.html.user(formWithErrors)))) { implicit request =>
  val userData = request.body
  val newUser = models.User(userData.name, userData.age)
  val id = models.User.create(newUser)
  Redirect(routes.Application.home(id))
}§Showing forms in a view template
Once you have a form, then you need to make it available to the template engine. You do this by including the form as a parameter to the view template. For user.scala.html, the header at the top of the page will look like this:
@(userForm: Form[UserData])(implicit messages: Messages)Because user.scala.html needs a form passed in, you should pass the empty userForm initially when rendering user.scala.html:
def index = Action {
  Ok(views.html.user(userForm))
}
The first thing is to be able to create the form tag. It is a simple view helper that creates a form tag and sets the action and method tag parameters according to the reverse route you pass in:
@helper.form(action = routes.Application.userPost()) {
  @helper.inputText(userForm("name"))
  @helper.inputText(userForm("age"))
}
You can find several input helpers in the views.html.helper package. You feed them with a form field, and they display the corresponding HTML input, setting the value, constraints and displaying errors when a form binding fails.
Note: You can use
@import helper._in the template to avoid prefixing helpers with@helper.
There are several input helpers, but the most helpful are:
form: renders a form element.inputText: renders a text input element.inputPassword: renders a password input element.inputDate: renders a date input element.inputFile: renders a file input element.inputRadioGroup: renders a radio input element.select: renders a select element.textarea: renders a textarea element.checkbox: renders a checkbox element.input: renders a generic input element (which requires explicit arguments).
As with the form helper, you can specify an extra set of parameters that will be added to the generated Html:
@helper.inputText(userForm("name"), 'id -> "name", 'size -> 30)The generic input helper mentioned above will let you code the desired HTML result:
@helper.input(userForm("name")) { (id, name, value, args) =>
    <input type="text" name="@name" id="@id" @toHtmlArgs(args)>
}
Note: All extra parameters will be added to the generated Html, unless they start with the _ character. Arguments starting with _ are reserved for field constructor arguments.
For complex form elements, you can also create your own custom view helpers (using scala classes in the views package) and custom field constructors.
§Displaying errors in a view template
The errors in a form take the form of Map[String,FormError] where FormError has:
key: should be the same as the field.message: a message or a message key.args: a list of arguments to the message.
The form errors are accessed on the bound form instance as follows:
errors: returns all errors asSeq[FormError].globalErrors: returns errors without a key asSeq[FormError].error("name"): returns the first error bound to key asOption[FormError].errors("name"): returns all errors bound to key asSeq[FormError].
Errors attached to a field will render automatically using the form helpers, so @helper.inputText with errors can display as follows:
<dl class="error" id="age_field">
    <dt><label for="age">Age:</label></dt>
    <dd><input type="text" name="age" id="age" value=""></dd>
    <dd class="error">This field is required!</dd>
    <dd class="error">Another error</dd>
    <dd class="info">Required</dd>
    <dd class="info">Another constraint</dd>
</dl>
Global errors that are not bound to a key do not have a helper and must be defined explicitly in the page:
@if(userForm.hasGlobalErrors) {
  <ul>
  @for(error <- userForm.globalErrors) {
    <li>@error.message</li>
  }
  </ul>
}§Mapping with tuples
You can use tuples instead of case classes in your fields:
val userFormTuple = Form(
  tuple(
    "name" -> text,
    "age" -> number
  ) // tuples come with built-in apply/unapply
)
Using a tuple can be more convenient than defining a case class, especially for low arity tuples:
val anyData = Map("name" -> "bob", "age" -> "25")
val (name, age) = userFormTuple.bind(anyData).get§Mapping with single
Tuples are only possible when there are multiple values. If there is only one field in the form, use Forms.single to map to a single value without the overhead of a case class or tuple:
val singleForm = Form(
  single(
    "email" -> email
  )
)

val emailValue = singleForm.bind(Map("email" -> "[email protected]")).get§Fill values
Sometimes you’ll want to populate a form with existing values, typically for editing data:
val filledForm = userForm.fill(UserData("Bob", 18))When you use this with a view helper, the value of the element will be filled with the value:
@helper.inputText(filledForm("name")) @* will render value="Bob" *@
Fill is especially helpful for helpers that need lists or maps of values, such as the select and inputRadioGroup helpers. Use options to value these helpers with lists, maps and pairs.
§Nested values
A form mapping can define nested values by using Forms.mapping inside an existing mapping:
case class AddressData(street: String, city: String)

case class UserAddressData(name: String, address: AddressData)
val userFormNested: Form[UserAddressData] = Form(
mapping(
"name" -> text,
"address" -> mapping(
"street" -> text,
"city" -> text
)(AddressData.apply)(AddressData.unapply)
)(UserAddressData.apply)(UserAddressData.unapply)
)Note: When you are using nested data this way, the form values sent by the browser must be named like
address.street,address.city, etc.
@helper.inputText(userFormNested("name"))
@helper.inputText(userFormNested("address.street"))
@helper.inputText(userFormNested("address.city"))§Repeated values
A form mapping can define repeated values using Forms.list or Forms.seq:
case class UserListData(name: String, emails: List[String])val userFormRepeated = Form(
mapping(
"name" -> text,
"emails" -> list(email)
)(UserListData.apply)(UserListData.unapply)
)When you are using repeated data like this, there are two alternatives for sending the form values in the HTTP request. First, you can suffix the parameter with an empty bracket pair, as in “emails[]”. This parameter can then be repeated in the standard way, as in http://foo.com/request?emails[][email protected]&emails[][email protected]. Alternatively, the client can explicitly name the parameters uniquely with array subscripts, as in emails[0], emails[1], emails[2], and so on. This approach also allows you to maintain the order of a sequence of inputs.
If you are using Play to generate your form HTML, you can generate as many inputs for the emails field as the form contains, using the repeat helper:
@helper.inputText(myForm("name"))
@helper.repeat(myForm("emails"), min = 1) { emailField =>
    @helper.inputText(emailField)
}
The min parameter allows you to display a minimum number of fields even if the corresponding form data are empty.
§Optional values
A form mapping can also define optional values using Forms.optional:
case class UserOptionalData(name: String, email: Option[String])val userFormOptional = Form(
mapping(
"name" -> text,
"email" -> optional(email)
)(UserOptionalData.apply)(UserOptionalData.unapply)
)This maps to an Option[A] in output, which is None if no form value is found.
§Default values
You can populate a form with initial values using Form#fill:
val filledForm = userForm.fill(UserData("Bob", 18))Or you can define a default mapping on the number using Forms.default:
Form(
  mapping(
    "name" -> default(text, "Bob")
    "age" -> default(number, 18)
  )(User.apply)(User.unapply)
)
§Ignored values
If you want a form to have a static value for a field, use Forms.ignored:
val userFormStatic = Form(
  mapping(
    "id" -> ignored(23L),
    "name" -> text,
    "email" -> optional(email)
  )(UserStaticData.apply)(UserStaticData.unapply)
)§Putting it all together
Here’s an example of what a model and controller would look like for managing an entity.
Given the case class Contact:
case class Contact(firstname: String,
                   lastname: String,
                   company: Option[String],
                   informations: Seq[ContactInformation])

object Contact {
  def save(contact: Contact): Int = 99
}

case class ContactInformation(label: String,
                              email: Option[String],
                              phones: List[String])
Note that Contact contains a Seq with ContactInformation elements and a List of String. In this case, we can combine the nested mapping with repeated mappings (defined with Forms.seq and Forms.list, respectively).
val contactForm: Form[Contact] = Form(

  // Defines a mapping that will handle Contact values
  mapping(
    "firstname" -> nonEmptyText,
    "lastname" -> nonEmptyText,
    "company" -> optional(text),

    // Defines a repeated mapping
    "informations" -> seq(
      mapping(
        "label" -> nonEmptyText,
        "email" -> optional(email),
        "phones" -> list(
          text verifying pattern("""[0-9.+]+""".r, error="A valid phone number is required")
        )
      )(ContactInformation.apply)(ContactInformation.unapply)
    )
  )(Contact.apply)(Contact.unapply)
)
And this code shows how an existing contact is displayed in the form using filled data:
def editContact = Action {
  val existingContact = Contact(
    "Fake", "Contact", Some("Fake company"), informations = List(
      ContactInformation(
        "Personal", Some("[email protected]"), List("01.23.45.67.89", "98.76.54.32.10")
      ),
      ContactInformation(
        "Professional", Some("[email protected]"), List("01.23.45.67.89")
      ),
      ContactInformation(
        "Previous", Some("[email protected]"), List()
      )
    )
  )
  Ok(views.html.contact.form(contactForm.fill(existingContact)))
}
Finally, this is what a form submission handler would look like:
def saveContact = Action { implicit request =>
  contactForm.bindFromRequest.fold(
    formWithErrors => {
      BadRequest(views.html.contact.form(formWithErrors))
    },
    contact => {
      val contactId = Contact.save(contact)
      Redirect(routes.Application.showContact(contactId)).flashing("success" -> "Contact saved!")
    }
  )
}
Next: Protecting against CSRF